How Do You Know the Correct Level for Toilet Tank
If you need to remove an old toilet and install a new one, you'll need these tips!
Larn tips and tricks to perform a professional toilet removal and installation on your own.
What to Do Before Choosing Your New Toilet
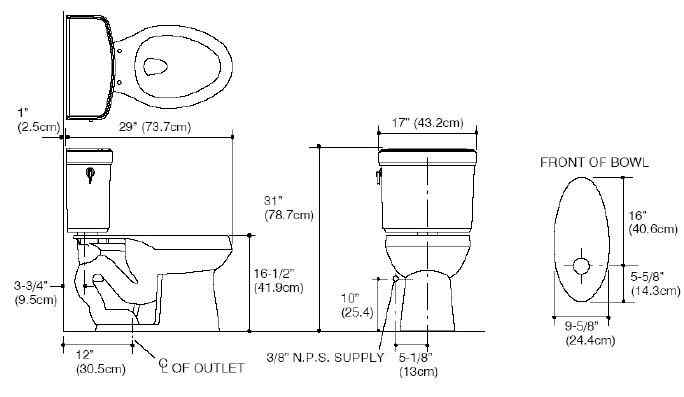
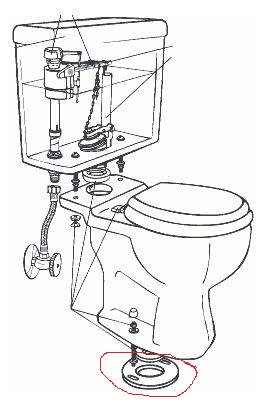
Mensurate from the dorsum wall behind your toilet to the toilet bolt. The toilet bolt is the bolt that sticks up from the floor through the porcelain on the foot of the toilet and is normally covered by a cap. The job of the toilet commodities is to help create a watertight seal between the toilet bowl and the toilet flange and to secure the toilet to the flooring.
Measure Your Rough
There are three possible measurement distances you can get from the wall to the toilet bolt: 10 inches, 12 inches, or xiv inches. The most mutual is 12 inches. In plumbing terminology, this is chosen a 12-inch rough.
Sometimes these measurements are not exact. For case, if your measurement is xi.5 inches, that would be a 12-inch rough. If you buy your toilet online or from your local shop, your crude measurement becomes very important.
Mensurate Your Current Supply Tube
Mensurate the length of your current supply tube. This style yous will know what approximate length you require for your new supply tube. Never reuse the one-time supply tube. Generally, the distance between the outlet of the finish/shutoff valve to the water inlet of your quondam tank will be very close to the new toilet supply tube measurement.
Steel mesh toilet supply (also known as toilet connector) tube lengths are as follows: vi", 9", 12", 16", and 20".
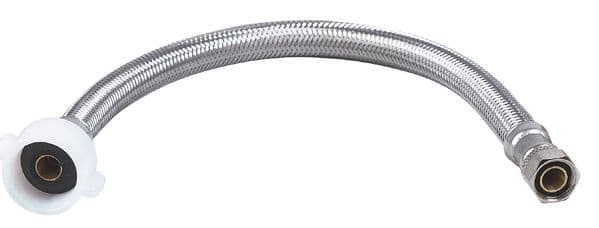
This steel mesh water supply tube is also known as a "burst proof" supply by plumbers that tend to exist a little dramatic.
The photo above shows a supply tube specifically designed for toilets, almost commonly known as a "toilet supply". Notice the plastic 0.five-inch nut—this is the easiest way to recognize this type of supply.
- Measuring tape
- Kneepads or a kneeling pad
- 2 small crescent wrenches
- Long standard screwdriver
- Groove joint pliers (likewise known as channel locks)
- Small metal saw
- Level
- Box knife
- Pocket-sized drywall taping pocketknife
- Hand truck
- Disposable polypropylene gloves
- A safety cleaner/degreasing agent
- Paper towel
- Thick plastic bag or sheet
- Duct tape
Items you will demand to remove the h2o from the old tank and toilet bowl:
- The Best: a large shop vac for liquid.
- Alternate Method: A large sponge and a bucket.
Items Yous May Need to Install Your New Toilet
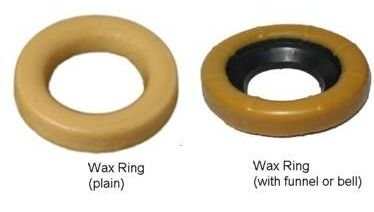
- Wax ring, standard or butt. Buy two standard and ane barrel wax band.
- Supply tube.
- An assortment of stainless steel and brass toilet commodities kits with extra washers and nuts.
- Loftier-quality tank-to-bowl bolts. Nigh kits come with 3 bolts and accessories.
- Colored or clear tub and tile caulking.
- 100% clear silicone seal.
Remember, you can always render what you don't utilise.
Water Shutoff
Read More than From Dengarden
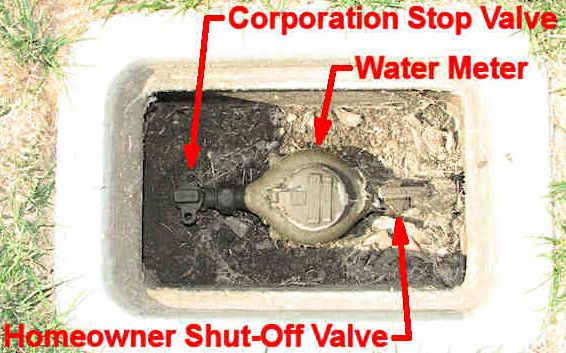
Water Shutoff Valve Diagram
How to Shut the H2o Off for Your Entire Abode
This is extremely important. You lot must know how to shut the water off to your entire home. Properly plumbed homes come with a whole business firm shut off. The possible locations are:
- In the basement most the wall facing the street.
- Under the home in the crawl space, well-nigh likely toward the front of the home.
- Within ii feet of the front of the habitation underneath a chapeau within a compartment.
- Homes on wells have likewise many dissimilar configurations to name here. As a "practise it yourself-er" you probably already know how to shut your system off.
If you cannot discover your whole-business firm h2o shutoff, about water service jurisdictions volition ask you to call them to shut your water off from the street service at your water meter. If this is non required you can purchase an cheap h2o meter key at your local hardware store. Please phone call your water service provider for farther instructions on this indicate.
It is non necessary to plough the water off to your entire home to supercede the toilet. Knowing how is but a precaution if something goes incorrect.
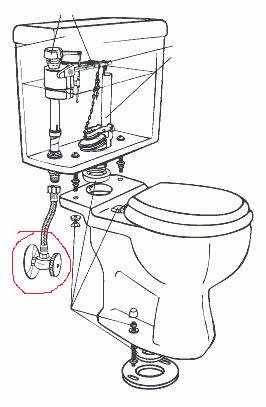
Toilet Diagram
Toilet Replacement Steps
First and foremost, put on your dispensable gloves!
1. Turn the water off to your toilet.
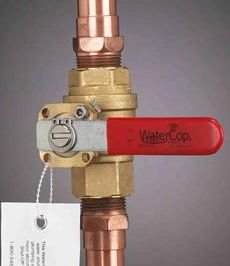
Behind the toilet, y'all will find a minor valve. The 2 common valves are a ¼ plough valve and the gate valve. A shut-off valve for a unmarried fixture is ordinarily chosen a stop valve or simply a "stop". Dramatic plumbers may call it an emergency valve.
two. Flush the toilet.
Concur the handle down until the h2o stops moving in the tank and bowl. Note: if the tank continues to fill up there may be a problem with your shutoff valve. At that point, you may consider turning the water off to your dwelling or replacing the valve. Replacing a faulty valve is always the quality choice.
Extremely of import: if y'all make up one's mind to shut the water off to your home, you must turn the water supply off to your water heater. This will not impact your water heater but will salve it from perchance draining out and called-for out the h2o heater. This precaution is a "better safe than lamentable" precaution. You practice non need to turn your h2o heater off completely past shutting off the ability or the fuel supply.
three. Remove the remainder of the water from the tank and the bowl.
Employ the store vac to make this a quick job. Depending on the size of the store vac and how much water is left in the tank and basin, you may accept to empty the h2o from the shop vac more in one case. No matter how dry out you become information technology, there will always be some h2o left. Be prepared for some water to spill on the flooring.
If yous do not have a shop vac, use a sponge and bucket to sop up as much water as you can. When y'all are through, it is best to throw the sponge away and then it will not mistakenly exist used for cleaning purposes.
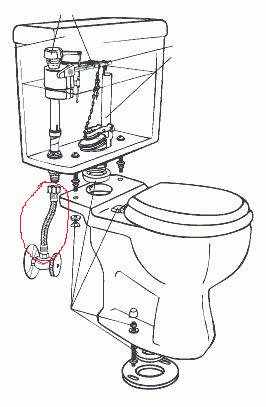
Toilet Diagram
four. Disconnect the supply tube from the shutoff (or stop) valve.
There'southward usually no demand to remove it from the toilet. Paper towels come in handy at this point, there will exist a little water spillage. The most common size supply tube connexion to the valve is a 3/8-inch hexagon compression nut. If you lot're not certain what the size is, or information technology is non 3/8 inch, you can always remove the supply tube and take it with you for comparison when purchasing a new supply tube.
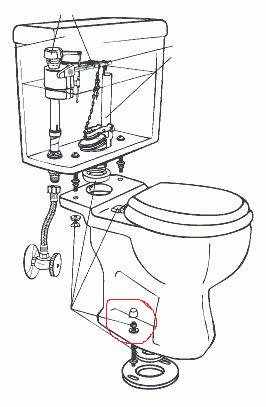
Toilet Diagram
5. Remove the nuts from the toilet bolts.
Usually, at that place are two white caps covering the toilet bolts at the base of the toilet that need to exist removed offset. Almost are plastic (though some older toilets have porcelain caps), unless you intend to reuse them, don't worry most breaking them. Your new toilet will come up with new caps.
To remove them shove a screwdriver underneath them and so twist the screwdriver and they should pop off. If that does not work, take hold of and squeeze them with large groove articulation pliers (channel locks) until they pop off or break. Then remove the nuts and washers and so merely the bolts are left.
If the nuts are extremely rusted they may crumble. If they're not that bad, spray them with a product like WD xl then go take a half-hour pause to let information technology soak into the threads. Annotation; always read labels on products like WD 40 and follow their safety recommendations. This might be a good time to follow step nine, "Assemble your new toilet".
half-dozen. Remove the toilet.
A well installed toilet e'er has a bead of sealant around the outer edge of the foot of the toilet where the porcelain meets the floor. Using a box knife cut through that sealant using the porcelain as your guide, not the floor. Cutting cautiously as not to damage the floor. Have a piece of plastic ready on the flooring close by to set the toilet on.
A toilet is heavy, never lift with your back, always with your legs. To exercise this you lot must straddle the toilet facing the back of the toilet. Position your body over the portion of the toilet where the toilet seat is continued to the toilet bowl.
This is where yous will too place your hands to take hold of and lift the toilet. Grab the toilet, sink through your knees, straighten your back and lift with your legs. If the toilet is being stubborn, you may have to rock it side to side to loosen information technology from the floor.
If the bath floor is old, be cautious non to option the floor covering up, like linoleum tiles. A stuck toilet is common; usually, an actress box knife piece of work will free information technology from the floor.
6 a. Don't be a hero and twist your dorsum. It may expect funny but information technology can save you some hurting. With the toilet hanging under you, waddle over to the plastic yous have prepared on the floor and place the toilet on that. Again, in that location may exist some water spillage.
6b. With the duct tape, tape the plastic up against the bowl. This will preclude any leakage on the floor in your home when you motility the toilet outside. Use your handcart to motion the toilet from this signal on. Information technology is a little slippery and unwieldy, a helper would come in handy to help you to stabilize and move the toilet outside.
Toilet Diagram
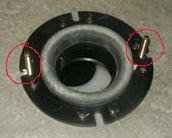
7. Make clean the toilet flange.
using the pocket-size drywall taping knife, paper towel and degreaser. Remove every bit much of the one-time wax ring equally you lot tin can, exist carful where you put it, wax is very glutinous and difficult to clean upward.
8. Install new toilet bolts.
If your toilet flange is plastic, remove the toilet bolts. This is also the perfect opportunity to clean the expanse of the flooring where the old toilet has been sitting. If your toilet flange is cast iron, the toilet bolts may snap off when attempting to remove them.
Note: Do not put your channel locks directly on the threads this will ruin the threads and make the commodities unusable.
Your commencement attempt to remove these bolts should be with the double nut method. Place two nuts on the bolt and thread them downwards to where there is approximately one nut distance from the flange.
With two wrenches tighten the nuts together turning the top nut clockwise and the bottom one counterclockwise. You can apply some force here. Grabbing the lesser nut with a crescent wrench turn information technology counterclockwise, this should force the commodities out without damaging the threads.
There is no guarantee that this bolt will non snap. If it does, you will need a re-thread kit and an electric drill to install a new bolt. Usually, instructions come with such a kit.
Plough the bolt counterclockwise to unthread it out of the flange. If this becomes hard or it won't budge, use WB 40 on the threads and permit information technology soak in for a ½ hour. At this indicate, you must make a decision, reuse or supervene upon. If y'all tin replace them, exercise. Virtually hardware stores carry the all thread style toilet bolt kits specially designed for cast iron flanges.
Add a washer and a nut to each bolt, to keep the bolts deeply in place.
Place the bottom lip of the toilet bolts between the floor and the flange, in the location of the original bolts. Using a washer and a nut, tighten and secure the bolts to the flange. Make sure these bolts are centered on the flange and equally distant from the dorsum wall to the bolt. If yous have called to reuse the bolts in the cast iron flange make sure to utilise new stainless steel washers and basics when securing the toilet bowl to the flange.
Toilet Diagram
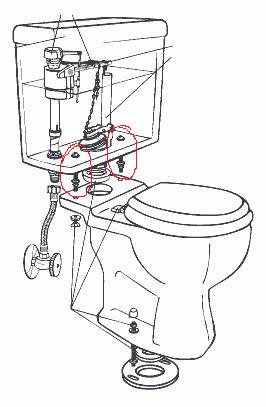
9. Assemble your new toilet.
This step can be done at any signal before step 10. If you take called a one-slice toilet, this stride is washed. If you have called a 2-slice toilet where the tank-to-basin bolts become through holes at the lesser of the tank, do equally their education asks, except add one thing; cover the safety washers with a good for you coat of 100% clear silicone seal.
This helps protect the rubber washers from corrosion and corrects any flaws in the porcelain, bolts or rubber that may cause a leak in the future. Note; silicon seal is very viscous so effort to stay every bit neat as possible and be careful what you touch with your gloved easily after.
Note: Some companies skimp on the quality of tank-to-bowl bolts. Unless you are sure the quality is high, it is recommended to replace these bolts, rubber washers and nuts with brass and/or stainless steel. Kits are available online or from your local hardware store.
nine a. Tighten the tank onto the bowl every bit per the instructions that came with your toilet, while making sure the tank looks perfectly perpendicular with the bowl. Likewise, picket that the tank and basin are level with each other horizontally as seen from the front. Do non put the tank lid or seat on nonetheless, these are one of the last steps.
x. Dry fit the toilet onto the flange.
With the same lifting technique, place the toilet on the flange so the toilet bolts beetle through the two holes at the base of operations of the toilet bowl. This is the fourth dimension to check that you have enough bolt thread sticking upwards above the porcelain base to comfortably install a washer and nut.
If the porcelain base of the toilet is too fat or the toilet flange too depression, the toilet bolts may exist besides curt. Extra long bolts are available at near local hardware stores. This will remedy the problem.
This dry out fit is also to make sure the footprint of the toilet is in direct contact with the floor. Sometimes there'south not enough infinite underneath the toilet and the toilet rests on the flange and not on the floor. The toilet will begin to wobble and if installed in this condition the toilet volition lose its wax seal and may cause water damage.
Two things that tin be done to fix this trouble.
- Adjust the flange height by removing information technology and replacing it with a new one. This should be washed by a plumber and guaranteed. This is not very cost effective simply if the toilet you take called is absolutely the ane you want then this must be done.
- Purchase a toilet with a deeper cavity within the footprint of the toilet basin. Choose a knowledgeable sales representative who tin offer you options.
11. Secure the toilet to the flange.
Remove the dry fit toilet from the flange. Wetting down your gloved hands with h2o volition end the wax from sticking to your gloves. Place the wax ring centered on the flange, don't worry if it rubs up against the toilet bolts.
Toilet installation instructions usually recommend placing the wax ring on the toilet first, not many plumbers do this. It makes the job much harder than it needs to exist. Make sure your wax ring is at room temperature before placing the toilet on it.
Notation: A common cold wax ring can carve up when squished, causing a leak and maybe water damage.
At this point, you can take off your protective gloves and throw them away.
11a. Carefully lower the toilet dorsum onto the flange using the bolts as a guide. It is not easy maneuvering a toilet in this manner, having a helper guide the toilet can brand this pace easier.
It is very important that the toilet lands on the wax start before the outer edge touches the floor. It will feel like a soft landing, unlike than when you did the dry fit. Keep the toilet level and let the toilet's own weight to slowly squish the wax ring.
After a few minutes, you can help it along past sitting backward on the toilet, using your own weight until the footprint of the toilet rests firmly on the floor. Visually inspect that the toilet bowl is straight out from the wall. If non, you tin can slightly twist it on the flange as far as the bolts volition permit.
xi b. Place your level on the rim of the toilet bowl from left to right to make sure the toilet bowl is plumb. If it is not, use plastic shims to level it. (run into the bottom of this article for additional shimming info.) Use the washers and nuts to tighten the bowl to the flange. If y'all take plastic caps for the bolts the instructions may require you to place a plastic washer designed for the caps under the nut. Be sure to get the right side up on those plastic washers.

Toilet Diagram
12. Install the supply tube.
Thread and tighten the 3/8 end of the supply tube to the toilet shutoff valve. Then thread and hand tighten the larger one-half-inch end of the supply tube to the threaded portion of the fill up valve that protrudes from the bottom of the tank.
Use a wrench to tighten it an extra half-turn or 180°. The best supply tube to employ has a steel mesh outer casing, with a special 1/2 inch nut specifically designed for toilets. Dramatic plumbers called this style of supply tube with the steel mesh "burst-proof".
13. Slowly turn on the water to the tank, while watching for leaks.
Any leaks on the supply tube will require extra tightening until the drip is stopped. If no leaks are detected, turn the valve on completely and let the tank to make full normally. Move your paw around to the back of the tank and underneath it to feel for any leaks or water where you cannot run across.
When you lot are satisfied there are no leaks at this point, flush the toilet. Cheque for leaks between the tank and the bowl, and the basin and the floor. Flush the toilet several times and make absolutely sure.
xiv. Finishing upward.
14 a. Place the tank lid on the tank.
fourteen b. Because there are many different styles of seats, read the instructions that come up with the toilet seat. Install the toilet seat as per instructions, just only finger tighten the bolts. Make sure the seat is positioned perfectly centered over the porcelain rim, and and then tighten the bolts very tightly. Even though those bolts are very tight, plan to tighten them at least in one case a year, they most e'er work themselves loose.
14 c. With the modest hacksaw, cut the toilet bolts to length, one or two threads above the nut. Use a wet cloth to clean up the metal filings then place the caps over the bolts. The plastic caps with the plastic washers snap on by pressing them downwardly firmly. The other style requires a bead of sealant or caulking to attach the base of operations of the cap to the porcelain.
14 d. Make sure the floor is clean and dry, and then place a thin dewdrop of caulking around the base of operations of the toilet. Using a wet finger and a piece of paper towel, run your finger along the base confronting the porcelain and the floor simultaneously, then wipe your finger off on the paper towel. Keep doing this until you lot take a very sharp about invisible dewdrop of caulking around the base of operations of the toilet. Clear caulking starts out white and then will dry clear. This is "goof-proof" caulking, any mistake you brand will disappear when it dries upwardly. Whatsoever other color you employ volition outset out as that colour and of course dry as that color. It is better not to utilise the toilet until the caulking is dry.
Some of the Bug Y'all May Run into
Plastic shims may need to be used if the flooring of the bathroom is uneven.
E'er offset past shimming the back of the toilet offset, and then work your way effectually. Shims in front end of the toilet are much more noticeable than ones in the back. Before you tighten the toilet to the flange, use a level on the rim of the bowl to brand sure the toilet is plumb. Do non apply wood shims, if they get wet they become soft and rot. Once the shims are fix, cut them off flush with the porcelain.
If you lot don't feel the wax band squish when you place the toilet.
This ways that the distance from the flange to the lesser of the toilet is more the thickness of your wax ring. The solution is to apply a fatter, butt-type wax ring or stack two standard wax rings on superlative of each other on the flange.
What to know if you have called to plow off the water supply to your abode.
Standard h2o pipes will not cause a problem. All the way up and into the 1970s galvanized pipage was installed in new homes of that time. The big trouble with this pipe is that it rusts from the inside out. Shutting off the water to your dwelling house reduces the outward pressure on these pipes causing them to shrink slightly, causing the rust on the inside to chip off. This can crusade low or even stopped water flow to your fixtures due to clogging.
The only way to stop this problem is by either replacing all the pipes in your home or non shutting the water off to your dwelling. If you take a persistent orangish band around your toilet, yous're constantly cleaning the rust out of your aerators or you accept to look a minute for your water to turn from orange to clear, then you accept galvanized pipes.
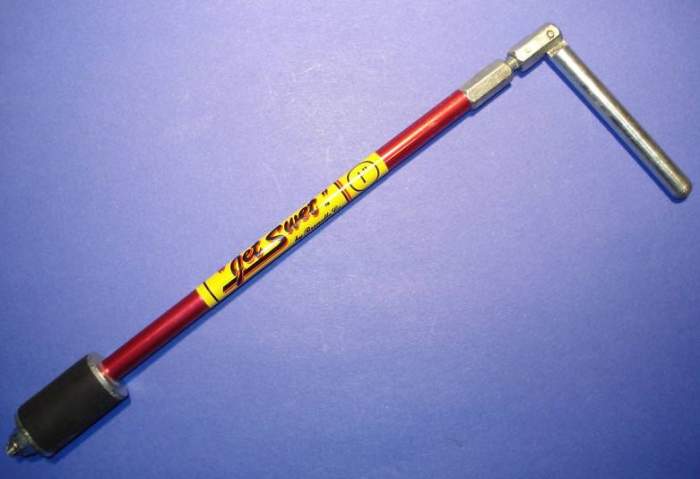
Jet Swet
Older homes with copper pipes have a common trouble.
Shutoff valves like the one for your toilet are installed using compression. Solder joints final forever, a compression joint actually digs into the copper creating a weak point. Over time the scouring properties of water will thin the edge portion of the copper pipe where the compression joint has created a bulge on the within circumference of the pipe.
Experienced plumbers will plough off the water to the house earlier attempting to close off the h2o to an individual fixture with a compression-fashion valve. Some plumbers volition carry what is chosen a "jet sweat" with them so if the shutoff valve does break off in their hand they tin apace insert the tool into the pipe and with a few twists of the handle close off the pipage avoiding a flood.
This commodity is accurate and true to the best of the author's knowledge. Content is for informational or entertainment purposes only and does not substitute for personal counsel or professional person advice in business, financial, legal, or technical matters.
© 2011 Rob S
sdfo on September 24, 2018:
no such matter every bit dramax or non about it
Susan hall on June 29, 2014:
My caulk volition not stay adhered to the vinyl flooring around my toilet, what I'm I doing wrong? It looks nice when I'g done, only a few months later it turns loose.
Alexander Silvius from Portland, Oregon on February 03, 2011:
Please send them immediately to:
The Cookie Monster
1 Smelly Feet Lane
Gaslight City, Nostate, 12345
Rob S (author) on February 03, 2011:
Beingness obsessed with item makes for a boring article. I do try to put something entertaining in the article, or at to the lowest degree at the end. The video at the bottom of the article is a Kohler commercial I detect entertaining, and hope you did also.
p.southward. My spirit of recycling only goes and then far but if you like, I will have some candles made so you can savor "that" aroma.
Alexander Silvius from Portland, Oregon on February 03, 2011:
This is an splendid set of instructions for someone who has never done this chore before. Seems similar you idea of every possible contingency hither.
Only I think that there is i detail I would scrape off the list. Kneepads are for sissies. Hee hee, but kidding.
I like the line about dramatic plumbers calling the shutoff and "emergency valve," that was hilarious. I hear the discussion "emergency" used hither and there to sprinkle fright and drama into ordinary conversations, information technology really irritates me.
The fob with shutting off the water heater is a great thought, it's not easy to go everyone to cooperate in a household and with the water off, someone may plow on the hot water and ruin your water heater.
Y'all know, in the spirit of recycling, I'chiliad surprised y'all didn't mention melting the wax ring into an aromatic candle for your home. Only think of the coin you'd save!
And least but non terminal, I think yous should rename this hub in honor of your detailed way that leaves no stone unturned: Pay obsession to item.
Really though, amazing and thorough directions. I feel like Neo when he said, "I know Kung Fu."
buttonbefterriager.blogspot.com
Source: https://dengarden.com/home-improvement/Trade_secrets_for_a_quality_toilet_installation
0 Response to "How Do You Know the Correct Level for Toilet Tank"
Post a Comment